Efficiency Unleashed: Dockerizing and Optimizing a FastAPI App with SlimToolkit and GitHub Actions


Table of contents
- FastAPI Setup and Example
- Dockerizing FastAPI App
- Optimize it with Slimtoolkit
- Automate using Github Actions
Ever wondered why some Docker images turn out to be so big, even though Docker is supposed to be lightweight? As a DevOps beginner, I used to think Docker images were super light, but then I found myself dealing with 2-3GB monsters. Curious, I hit up Stack Overflow, Docker Docs, and YouTube to see if there's a way to shrink these giants. Turns out, there are some cool tricks! Things like using lighter starting points, doing Multistage Builds, and cleaning up unnecessary stuff (libraries and dependencies) can really slim down your Docker image. Another method I discovered is creating specific Docker images for different services and then connecting those services over a network. This approach is often used in microservices architecture and adds another layer of efficiency to your Docker game.
A few days later, I stumbled upon a hackathon hosted by Slim.ai. Excited, I decided to join in. As I explored the Slim.ai documentation, I was blown away by the tools they offered. It turned out the solution I had been searching for, to optimize Docker images, was right there!
FastAPI Setup and Example
Now, let's dive in and explore how we can leverage SlimToolkit to optimize a Docker image. For this demonstration, I'll be using a FastAPI app as an example.
Creating Virtual Environment
First things first, let's create a simple FastAPI app with a basic route. Let's create an empty directory and open it in VSCode Editor. And create an app/main.py file(empty).
And now create a virtual environment in which we can pip install fastapi library. The pip install fastapi[all] installs all dependencies with fastapi we might need, like uvicorn(which helps us in running the fastapi app on the server).
💡 Best Practice Tip :
Utilizing a virtual environment is crucial when packaging this app into a Docker image. It isolates the required Python libraries from the host machine, ensuring consistency and reproducibility. This practice simplifies management, minimizing potential conflicts and enhancing the app's portability across diverse environments.
python3 -m venv venv
source ./venv/bin/activate
pip install fastapi[all]

Code
Now that we have our FastAPI app set up, let's infuse it with some chess magic. Open the app/main.py file and introduce a basic route to fetch random interesting facts about chess. Let's dive into the code and spice up our app with a touch of chess trivia!".
#importing libs
from fastapi import FastAPI
import random

# instance of fastapi app
app = FastAPI()

# list of some chess facts
chess_facts = [
    "The longest recorded game of chess took 20 hours and 15 minutes!",
    "The word 'checkmate' comes from the Persian phrase 'Shah Mat,' which means 'the King is helpless.'",
    "The number of possible ways of playing the first four moves per side in chess is 318,979,564,000.",
    "The queen used to only be able to move one square at a time, and it wasn't until the 15th century in Spain that the queen gained its current powerful abilities.",
    "The folding chess board was invented by a priest in 1125 who was forbidden to play chess.",
    "The longest confirmed unbeaten streak at an elite level belongs to Magnus Carlsen, who achieved an unbeaten streak of 125 games in the classical time format.",
]

# decorator with home route "/". When the '/' route is accessed it executes get_chess_fact function
@app.get("/")
def get_chess_fact(): #selects random chess fact from the list and returns it in JSON format.
    """Returns a random interesting fact about chess."""
    random_fact = random.choice(chess_facts)
    return {"chess_fact": random_fact}
Now let's run this app using uvicorn .
So, when you run the command uvicorn app.main:app, you are telling Uvicorn to:
Look for the FastAPI application instance (
app) within themainmodule of theapppackage.Start the server and make the FastAPI application available at the specified host and port (default is
http://127.0.0.1:8000/ or http://localhost:8000).When
--reloadis included, it enables automatic code reloading. This means that the server will restart whenever changes are detected in the source code. It's an optional flag, but it's useful during development. Not recommended in production.
uvicorn app.main:app --reload
Testing App
After executing the following command, we get JSON schema on the browser. Localhost :)
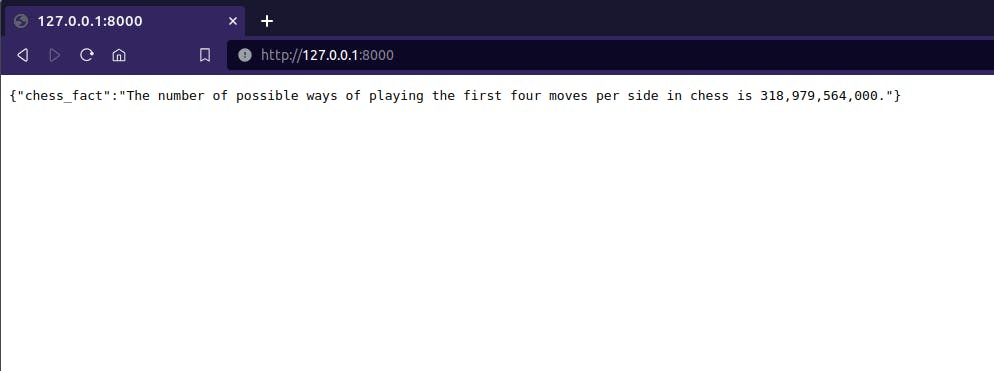
And that's a wrap we have built a basic API using Fastapi.
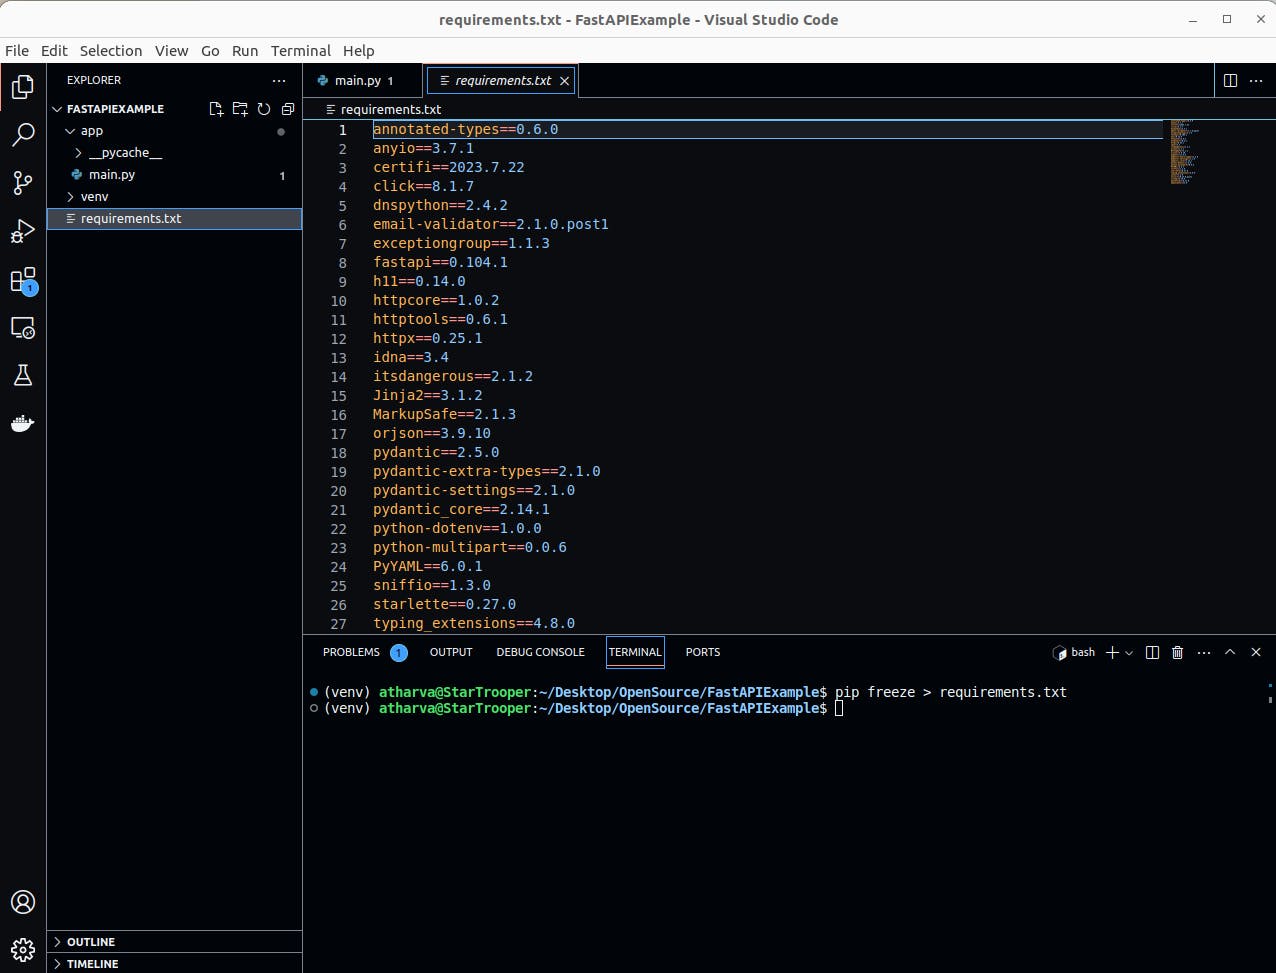
Gather Requirements and Dependencies
Now, let's move forward and build a Docker image for our FastAPI app. To streamline the process, we'll leverage the virtual environment we created earlier. This virtual environment helps ensure a clean and isolated environment for our app. To generate the requirements.txt file containing all the necessary dependencies, execute the command pip freeze > requirements.txt. This command captures the specific versions of the Python packages used in our FastAPI app. With the requirements.txt file in place, we are ready to proceed with the Docker image creation, ensuring that our app's dependencies are well-defined and can be seamlessly reproduced in different environments.
pip freeze > requirements.txt
Dockerizing FastAPI App
Let's take the next step in containerizing our FastAPI app by creating a Dockerfile. Navigate to the root directory of your project and create a new file named Dockerfile.
FROM python:3.9-slim #base image

WORKDIR /code #sets the working dir inside container

COPY ./requirements.txt /code/requirements.txt #copies requirements.txt inside code dir with same name

RUN pip install --no-cache-dir --upgrade -r /code/requirements.txt #pip installs libraries mentioned in requirements.txt

COPY ./app /code/app #copies app dir inside code dir

CMD ["uvicorn", "app.main:app", "--host", "0.0.0.0", "--port", "80"] #uvicorn cmd to run fastapi app when container starts
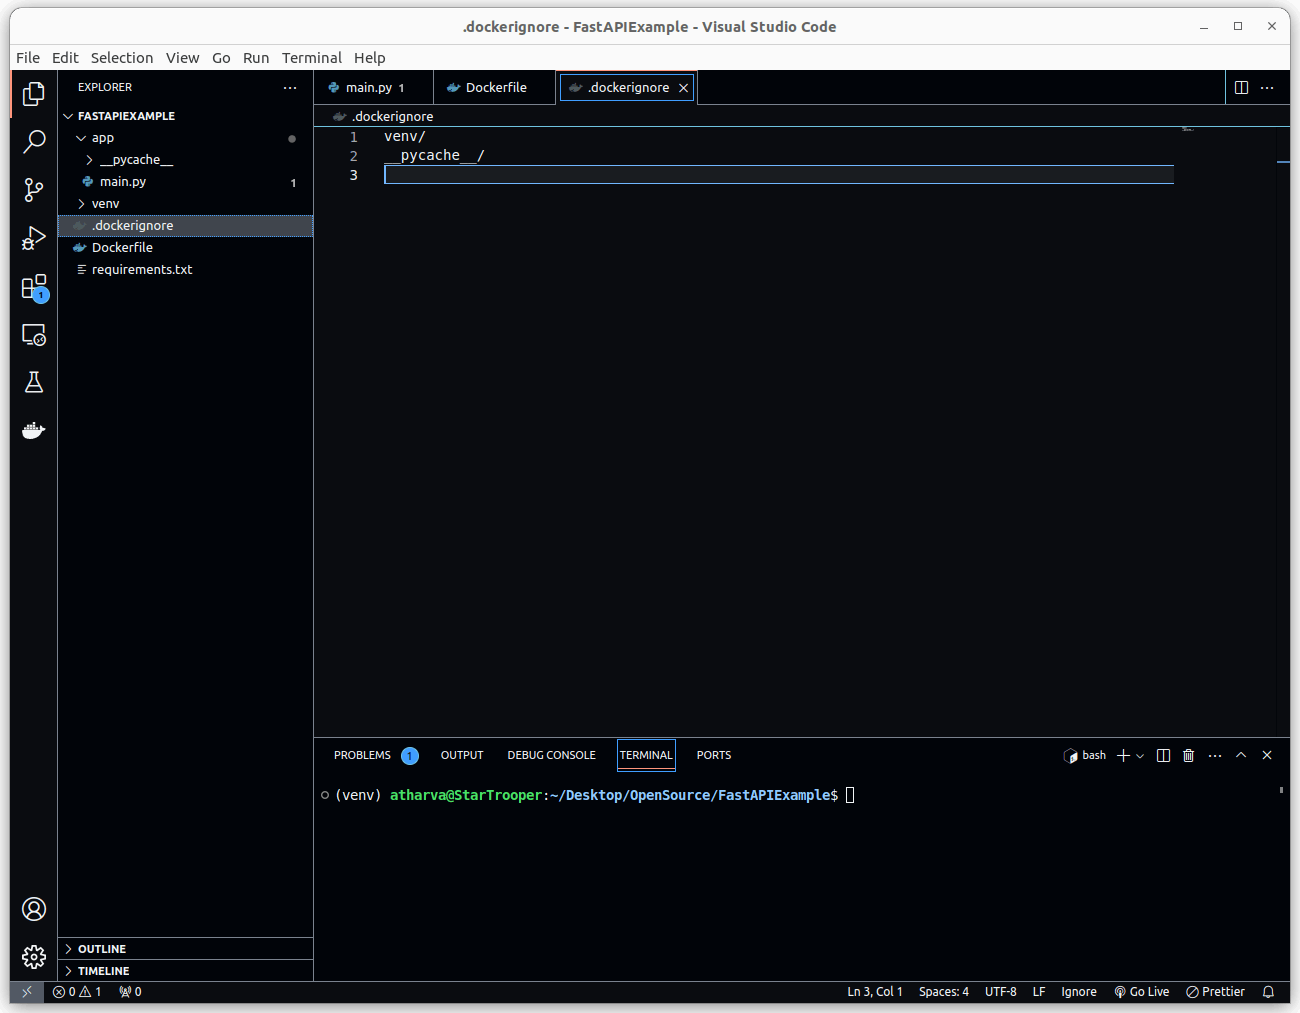
Ignore Virtual Environment
Before building a docker image, one thing we need to add is .dockerignore. We don't need docker to copy venv and pycache directories inside the docker image. Project structure before building the docker image
venv/
__pycache__/
Project structure before building docker image
Docker Build
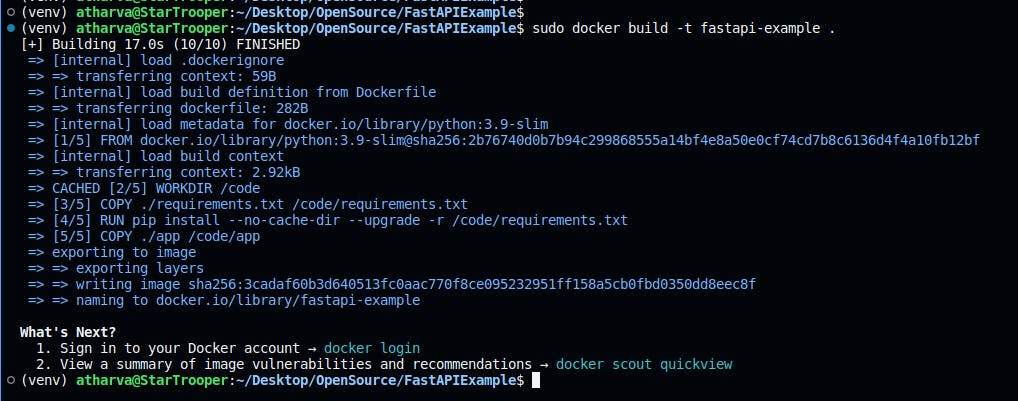
Now that we have our Dockerfile and .dockerignore file ready, let's proceed to build a Docker image for our FastAPI app. Open your terminal and navigate to the project's root directory where your Dockerfile is located.
This command initiates the Docker image-building process, assigning the tag fastapi-example to the resulting image.
The . at the end of the command signifies that the build context includes the current directory, where our Dockerfile and associated files reside.
docker build -t fastapi-example .
Once the build is complete, we'll have a Docker image ready to encapsulate our FastAPI application, making it portable and deployable across various environments.
Docker Run
With the Docker image of our FastAPI app successfully built, let's take it for a spin!
Breaking down the command:
docker run -d --name fastapicontainer -p 80:80 fastapi-example
docker run: Initiates the running of a Docker container.-d: Runs the container in detached mode, allowing it to run in the background.--name fastapicontainer: Assigns the name 'fastapicontainer' to the running Docker container.
💡 Best Practice Tip:
The--nameflag is optional; by default, Docker assigns a random name to the container. However, it is considered good practice to use the--nameflag and provide a meaningful name to your Docker container. This practice makes it easier to identify and manage your containers, especially when dealing with multiple instances.
-p 80:80: Maps port 80 from the host to port 80 in the container, allowing access to the FastAPI app.fastapi-example: Specifies the Docker image to use for creating the container.
This command launches our FastAPI app in a Docker container, making it accessible at http://localhost:80 or http://0.0.0.0:80 on your host machine. You can now test and verify that the containerized FastAPI app behaves as expected, just like it did before we Dockerized the application.

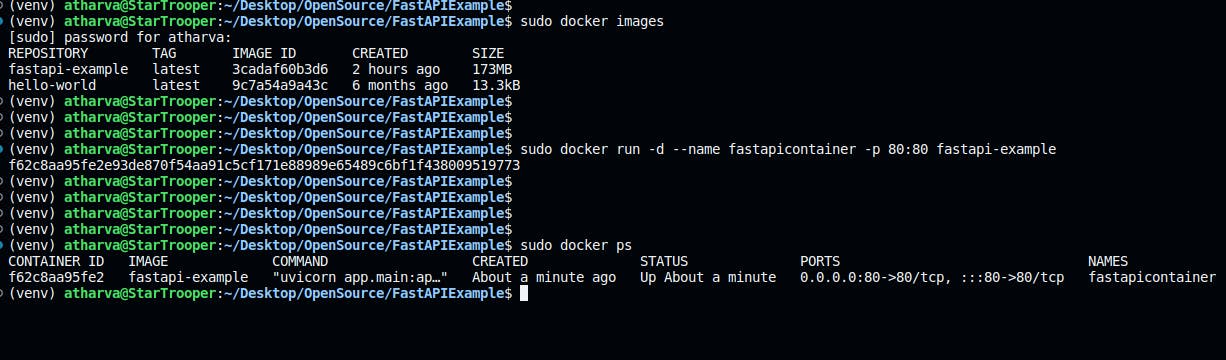

Yes, it's working great as expected✌️.
Optimize it with Slimtoolkit
Let's take our optimization journey a step further using SlimToolkit. With just one command, we can enhance the efficiency of our Docker image.
slim build: Initiates the SlimToolkit build process.--target fastapi-example: Specifies the target Docker image to optimize.--http-probe=true: Enables HTTP probing to enhance image size reduction.
SlimToolkit's
--http-probeoption, enabled by default, actively analyzes our app runtime behaviour, ensuring precise and efficient Docker image optimization.
--expose 80: Specifies that port 80 should be exposed in the optimized image.
slim build --target fastapi-example --http-probe=true --expose 80
Working of the Slimtoolkit Optimization Process :
Temporary Container Creation:
- Firstly SlimToolkit generates a temporary container after the build command, mirroring the environment of our FastAPI app and also apps built with other languages and frameworks.
Behaviour Analysis through Interaction:
- Actively engaging with the temporary container via requests to app endpoints (HTTP probing), SlimToolkit observes and identifies actively used parts during runtime.
Dependency Insight:
- By analyzing observed behaviour, SlimToolkit pinpoints the specific libraries and dependencies that are actively utilized by our FastAPI app.
Efficient Docker Image Optimization:
- Armed with dynamic insights, SlimToolkit optimizes the Docker image by including only the essential components and dependencies used at runtime, resulting in a streamlined and efficient Docker image

After executing the 'slim build' command, SlimToolkit kicks off the Docker image optimization process, providing detailed logs that offer insights into the optimization journey.
These logs include valuable information such as the extent of minification achieved compared to the original image size.
Additionally, SlimToolkit assigns a default name to the optimized image, making it easy to identify and distinguish from the original. Monitoring these logs provides a transparent view of the optimization gains and aids in understanding the impact of the slimming process on our Docker image.
Snippet from the slimtoolkit log :
cmd=build info=results status='MINIFIED' by='3.23X' size.original='173 MB' size.optimized='54 MB'
cmd=build info=results has.data='true' image.name='fastapi-example.slim' image.size='54 MB'
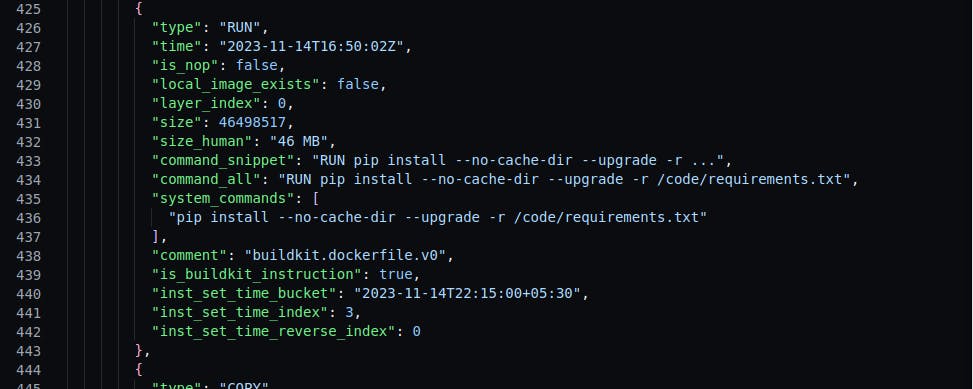
Report JSON file
The slim build command also auto-generates a report JSON file for our image. We can find the minified image size info, name and also the path where our temporary image was saved. Moreover, it gives us a layer by layer information regarding the image.

Docker Run
Let's test the optimised docker image


And it's working great🎉!
Automate using Github Actions
Automating tasks is one of my favourite work and Github Actions just opens up different possibilities to automate the docker build and automated testing etc.
So just push the code to Github and write some Github actions workflow yaml which will install slimtoolkit, build docker build, optimise docker image and also push the image to GitHub registry.
Github Repo : https://github.com/StarTrooper08/fastapi-chess-fact
Let's write a Github Actions Workflow to Automate the Docker Image Optimization process:
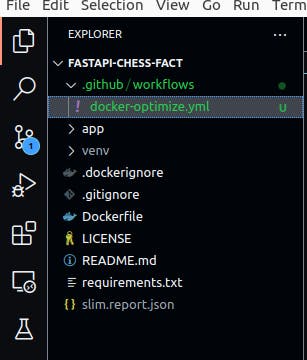
First, we will create a directory name .github/workflows/docker-optimize.yml inside our project.
Github, Action and Start!!!
![]()
Now, we can go ahead and start creating Github Actions workflow.
name: Build, Optimize and Publish Docker Image to Github Registry

on:
  push:
    branches: ['main']

jobs:
  build:
    runs-on: ubuntu-latest
    permissions:
      contents: read
      packages: write
YAML Explanation :
The line 1 gives a name to our workflow.
The
on: push: branches:part tells Github actions when to run workflow. Here we have on push and mentioned main branch which means whenever we push code/readme markdown anything to main branch then the workflow will run.The
jobs: build: runs-on:let us select the machine/system on which we want to run our workflow. Here, we have usedubuntu-latestbut we can use macOS and other Linux-based distros.We need to give some permissions to docker to build image/github package and push it to GitHub registry. To do so we use
permissions:keyword.
Slimtoolkit Installation on Github Actions Runner
steps:
      - name: Checkout Github Repo
        uses: actions/checkout@v3

      - name: Install Slimtoolkit
        shell: bash
        run: |
          curl -L -o ds.tar.gz https://downloads.dockerslim.com/releases/1.40.1/dist_linux.tar.gz
          tar -xvf ds.tar.gz
          mv dist_linux/docker-slim /usr/local/bin/
          mv dist_linux/slim-sensor /usr/local/bin/
          mv dist_linux/slim /usr/local/bin/

      - name : update slim
        shell: bash
        run: slim update
YAML Explanation :
From
steps:the actual part of the actions workflow starts. The steps keyword is used to define tasks that should be executed by our workflow.The
name:keyword gives name to an individual task.The
uses:keyword help us use the ready-made github actions in our workflow. Here we are usingactions/checkoutactions which are built by the Github Actions team itself this action just crawls through our GitHub repo and gives the required info to the actions runner environment.
The
name:anduses:is one component which does the task of checking out the GitHub repository.
Now, let's move to the second component which installs Slimtoolkit on the actions runner environment.
The
shell:keyword tells actions to use bash shell for this task.And
run:keyword runs the following command within the bash shell.
Here, we are downloading slimtoolkit using the curl command and then unzipping it using the tar command. After that, we move unzipped files to usr/local/bin/ directory.
- And finally, we just updated the slimtoolkit using
slim updatecommand. It's an optional step to add to the workflow. According to me, the actions workflow downloads the latest version every time it runs the workflow. But I thought adding the update command would be great.
Github Registry Login and Build Original Docker Image
      - name: Log in to Github Image Registry
        uses: docker/login-action@v3
        with:
          registry: ghcr.io
          username: ${{ github.actor }}
          password: ${{ secrets.GITHUB_TOKEN }}

      - name: Extract metadata (tags, labels) for Docker
        id: meta
        uses: docker/metadata-action@v5
        with:
          images: |
            ghcr.io/${{ github.repository }}

      - name: Build and push Docker images
        uses: docker/build-push-action@v5
        with:
          context: .
          push: true
          tags: ${{ steps.meta.outputs.tags }}
          labels: ${{ steps.meta.outputs.labels }}
YAML Explanation:
The first component is logging in to Github Image Registry, here we need to use
docker/login-action. And mention ghcr(Github Container Registry) as our registry so that we can push our both docker images non-optimized and optimized to it. The Github Token(secrets.GITHUB_TOKEN) generation and authentication part will be done automatically.The second component will extract metadata for docker to build a docker image for the Github Container Registry.
And final component we need is to Build and Push docker images. This component will build the original non-optimized docker image using the dockerfile we have inside our repository and push it to github container registry. The Github repository name and branch name will be used for the tag and label of the docker image.
Optimize and Push Docker Images to Github Container Registry
      - name: Optimize Docker Image
        run: slim build --target ghcr.io/startrooper08/fastapi-chess-fact:main --http-probe=true --expose 80

      - name: Push Optimized Docker Image to Github Registry
        run: docker push ghcr.io/startrooper08/fastapi-chess-fact.slim
YAML Explanation:
After we have built our original docker image, we can optimize the image using slimtoolkit command we have seen earlier in this blog.
The optimized docker image can be pushed to github container registry using the docker push command. Since authentication is already done by docker login actions. Here it won't ask for login credentials again.
Many of us might be curious why don't we use docker build and push actions here. I tried to use it but it was just renaming the original docker image and pushing it again with that name to github registry.
This way it worked for me and did what I was expecting(using docker push command).
And yeah that's it you need to Build, Optimize and Push Images to Github Container Registry.
Complete Github Actions YAML file looks like this
name: Build, Optimize and Publish Docker Image to Github Registry

on:
  push:
    branches: ['main']

jobs:
  build:
    runs-on: ubuntu-latest
    permissions:
      contents: read
      packages: write

    steps:
      - name: Checkout Github Repo
        uses: actions/checkout@v3

      - name: Install Slimtoolkit
        shell: bash
        run: |
          curl -L -o ds.tar.gz https://downloads.dockerslim.com/releases/1.40.1/dist_linux.tar.gz
          sudo tar -xvf ds.tar.gz
          sudo mv dist_linux/docker-slim /usr/local/bin/
          sudo mv dist_linux/slim-sensor /usr/local/bin/
          sudo mv dist_linux/slim /usr/local/bin/

      - name : update slim
        shell: bash
        run: slim update

      - name: Log in to Github Image Registry
        uses: docker/login-action@v3
        with:
          registry: ghcr.io
          username: ${{ github.actor }}
          password: ${{ secrets.GITHUB_TOKEN }}

      - name: Extract metadata (tags, labels) for Docker
        id: meta
        uses: docker/metadata-action@v5
        with:
          images: |
            ghcr.io/${{ github.repository }}

      - name: Build and push Docker images
        uses: docker/build-push-action@v5
        with:
          context: .
          push: true
          tags: ${{ steps.meta.outputs.tags }}
          labels: ${{ steps.meta.outputs.labels }}

      - name: Optimize Docker Image
        run: slim build --target ghcr.io/startrooper08/fastapi-chess-fact:main --http-probe=true --expose 80

      - name: Push Optimized Docker Image to Github Registry
        run: docker push ghcr.io/startrooper08/fastapi-chess-fact.slim
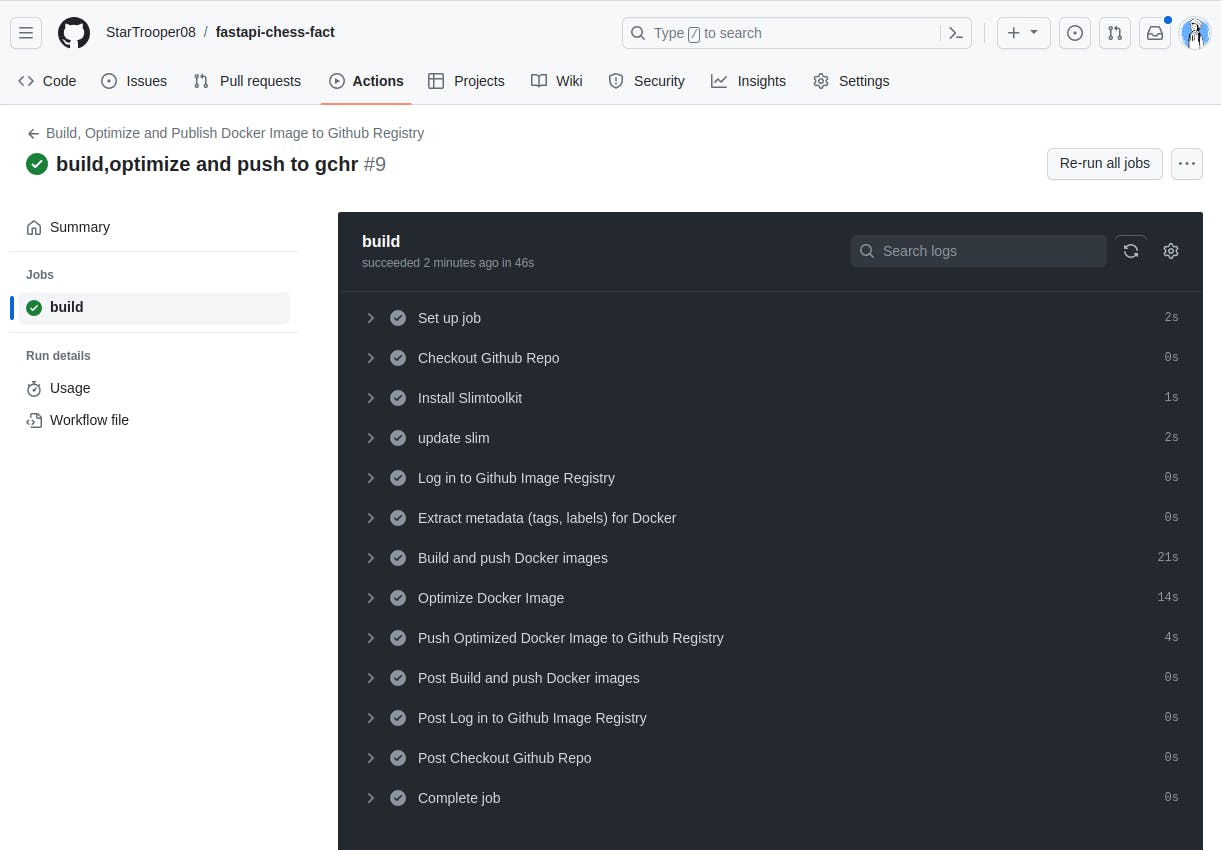
Github Actions Console:
Whenever we push new code or make some changes inside our github repository specifically on the branch we have mentioned inside our github actions workflow yml file, the Github Actions will be triggered and Build, Optimize and Push to Github Registry(GHCR) task will be performed.
You can try out this basic fastapi app using the docker. It works on my machine and it will work on your machine too 😜
docker pull ghcr.io/startrooper08/fastapi-chess-fact:main
Optimized Docker Image:
docker pull ghcr.io/startrooper08/fastapi-chess-fact.slim:latest
If you find this article helpful, you can follow me on socials for such content😄!!
Linkedin : https://www.linkedin.com/in/atharvashirdhankar/
Hashnode: https://atharva08.hashnode.dev/